Categories
Uncategorized

Lesson learned: modifying your permalink structure WILL mess up your traffic data

It made a small modification to my site’s permalink structure while I was developing a plugin: I changed my permalink structure from /%postname% to “/%postname%/” (notice the extra “/” in the latter).

Not a big deal, right? After all, your browser understands that:

http://www.vidalquevedo.com/how-to-load-css-stylesheets-dynamically-with-jquery

is the same as

http://www.vidalquevedo.com/how-to-load-css-stylesheets-dynamically-with-jquery/

With that in mind, this should be the same for your Google Analytics, right?

WRONG!

Actually, after I made that change, Google Analytics assumed that now the same page was actually TWO different pages, so the traffic data in one started to go down, while the the data in the other started to go up:

Here’s the traffic data with the “old” permalink structure:

And this one with the new one:


Same page, but now that it was being accessed via a “different” URL (with an extra “/” at the end), Google Analytics started to see it as two different pages. (Note that  apparently I made the change on Sept 12, since that’s when traffic started to move from one page to another).

Bummer.

Needless to say, now I have “duplicated” pages all over my traffic data, because the extra “/” was added to all pages on the site. I corrected the permalink to what it was before, and hopefully everything will go back to normal.

The takeway

Modifying your site’s permalink (or link) structure will definitely take a toll on your traffic data. Fortunately, in this case, people  (and search engines) can still get to the aforementioned page (phew!) But if your permalink structure has changed drastically and there are no redirection solutions implemented, a page that was ranking really high in search results will actually go down until the “new” page takes the time to crawl up, and that can take a while…

So, lesson learned: modifying your permalink structure (even slightly) WILL mess up your traffic data.


Categories
Uncategorized

WordPress: how to automatically convert custom fields to post tags

Hi all,

Sifting through stackoverflow.com I ran into this question: how do you add custom fields automatically as post tags in WordPress?

A while ago, someone asked something similar, and I put together a little script to help, but now I refined that script to be more encompassing. So, here’s a function to add custom fields automatically as post tags.

How it works

The vq20_convert_custom_fields_to_tags() function uses jQuery to retrieve the value of specific custom fields (which you can specify in an array, more on that below), and then adds those to the “tags” list on your post editor on save.

Instructions

  1. Put this script in your functions.php file in your WordPress install:
<?php

function vq20_convert_custom_fields_to_tags(){

    /*create list of custom fields to add as tags on save*/
    $custom_field_names = array();

    if(count($custom_field_names)>0) {?>
        <script type="text/javascript">
            jQuery(document).ready(function($){
            $('form#post').submit(function(event){
            <?php
                foreach($custom_field_names as $name){?>
                    cf_key = $('input[value="<?php echo $name; ?>"]').attr('id').replace('meta[', '').replace('][key]', '');
                    $('#new-tag-post_tag').val($('textarea[id*='+cf_key+']').val());
            <?php } ?>});
            });
        </script>
<?php
    }
}

add_action('admin_footer', 'vq20_convert_custom_fields_to_tags');

?>


* * * UPDATE * * *

A couple of  users in the comments below pointed out that the previous code was only adding the last custom field to the tag list, so I decided to go ahead and revamp the whole thing. Use this code instead:

<?php 

function vq20_convert_custom_fields_to_tags(){ ?>

  <script type="text/javascript">
    jQuery(document).ready(function($){      	

    	// Create list of custom fields to add as tags on save
    	// (e.g. var custom_field_names = ['my_custom_field', 'my_other_custom_field', 'yet_another_custom_field'];)
    	var custom_field_names = [];

    	$('form#post').submit(function(){
    		if(custom_field_names.length > 0) {
	    		var custom_field_values = [];
	    		$('#postcustom tr[id^="meta-"]').each(function(){
	    			var meta_id = $(this).attr('id').substring($(this).attr('id').indexOf('-')).replace('-','');
	    			if ($.inArray($(':text[id="meta[' + meta_id + '][key]"]').val(), custom_field_names) !== -1) {
	    				custom_field_values.push($('textarea[id="meta[' + meta_id + '][value]"]').val().toLowerCase());
	    			}
	    		});
	    		var tags = custom_field_values.join(',');
	    		$('#new-tag-post_tag').val(tags);
	    	}
    	});

    });
  </script>
<?php }
add_action('admin_footer', 'vq20_convert_custom_fields_to_tags');

?>


  1. Add the names of the custom fields you would like to automatically add as tags to the custom_field_names array
    
    // Create list of custom fields to add as tags on save 
    // (e.g. var custom_field_names = ['my_custom_field', 'my_other_custom_field', 'yet_another_custom_field'];) 
    var custom_field_names = ['my_custom_field', 'my_other_custom_field'];


  1. Save/upload your functions.php file, and then go to your post, add the matching custom field(s), and their values should be added as tags as soon as you save the post.

Note: this only works for custom fields holding individual values!!! (i.e. only one value per custom field will be added as a tag)

Let me know what you think!

Happy tagging!

Categories
Uncategorized

Testing Twitterfeed…

Just found out about Twitterfeed.com, a service that allows to automatically feed your blog posts to Twitter and Facebook. It does it by checking your site’s RSS feed every so often (30 min by default) and if there’s anything new, it posts it!

Yay, time saver! =)

Categories
Uncategorized

Web Dev tool of the week: JSFiddle.net

After seeing it featured in several articles as a tool for live examples, I can only say that JSFiddle is a dream come true: an experimental environment where you can test your HTML, JavaScript and CSS and see the results right there. You can even choose a framework to work with (jQuery, Mootools, Prototype) and start coding away.

Highly recommended. I’ll definitely be using it to test during development!

Get your hands on it: http://jsfiddle.net/

Categories
Uncategorized

Extend RSS2: a plugin to enhance your WordPress default RSS2 feed

Hi all,

I just published a new plugin, UW CALS Extend RSS2 Feed (killer name!), and I’m very excited about it.

Basically, this plugin allows you to include thumbnail and custom field information in your WordPress site’s default RSS2 feed, making it more complete.

Give a try! Here’s the link, and let me know what you think!

PS: don’t forget to visit my WordPress Plugins page for more goodies!

Categories
Uncategorized

How to add the excerpt box for pages in WordPress

By default, the WordPress post editor has an excerpt box that helps you add a little description to your posts. However, this option is not enabled by default for pages, so here’s the solution to that problem.

Add an excerpt meta box to pages

Pre-WordPress 3.0

The best way to add a meta box for pages in WordPress installs older than 3.0 is via the add_meta_box() function.

Add this code to your theme’s functions.php file:

<?php
function add_page_excerpt_support(){
   add_meta_box('postexcerpt', __('Page Excerpt'), 'post_excerpt_meta_box', 'page', 'advanced', 'core');
}

add_action('admin_init', 'add_page_excerpt_support');
?>

The code above tells WordPress to use the same “post_excerpt_meta_box()” callback function it employs to add the excerpt box for regular posts, to enable for pages as well.


WordPress 3.0 and up

WordPress 3.0 formally introduced support for new custom post types, which allow you to add custom content types besides the default “post” and “page” types. Along with this, the add_post_type_support() function was added to allow us to tell WordPress what “default” features we want a specific post type to support. Fortunately, we can use this to further extend the default “page” post type as well, such as adding an excerpt box to it.

Add this code to your theme’s functions.php file:

<?php
function add_page_excerpt_support(){
   add_post_type_support( 'page', 'excerpt' );
}

add_action('admin_init', 'add_page_excerpt_support');
?>

And that should be it! Now you should have a spankin’ new excerpt box ready to be filled on your WordPress page editor!

Categories
Uncategorized

WordPress: How to run PHP scripts only when logged in as admin

When developing for WordPress , sometimes you may be looking to run a small piece of code that you and only you can see, without disturbing the peaceful, beautiful flow of your carefully crafted website (and without annoying your users, of course).

So, here’s a small function I created, admin_level(), that’s come in handy several times while I’ve worked with WordPress. By placing this function in your theme’s functions.php file, you will be able to create “test areas” throughout your site where you can run code only when someone with enough permissions (e.g. an “admin” user) is logged in.

NOTE: Testing should ALWAYS be done on a test server separate from production!!! But hey, quick and dirty also does it =)

The admin_level() function


<?php
function admin_level($user_login=''){
	global $current_user;
	get_currentuserinfo();

	if(current_user_can('level_10')) {
		if ($user_login!=''){
			if($current_user->user_login==$user_login){
				return true;
			} else {
				return false;
			}
		} else {
			return true;
		}
	} else {
		return false;
	}
}
?>

The admin_level() function has only one optional parameter $user_login, which you can use to basically say “Hey, check that I’m user ‘username’ and have admin access.” If those conditions are met, it returns true, otherwise it returns false.

Examples

Create a “test area” in functions.php

After adding the admin_level()  function to your functions.php file, you can start using it to test things right away. Here’s an example of a “test area” within the function.php file itself (I usually do this at the end of the file, so I know where it is):

<?php

//Test Area

   //Only run following code if logged in as admin

   if( admin_level($user_login = 'vidal') ){

      //run your awesome code right here, admin!!!

   }

//End Test Area

?>


Another (inverse) example: redirecting from header.php

Here’s a redirecting script I used on header.php to send anyone who was NOT logged in as admin user ‘vidal’ somewhere else:

<?php

if( !admin_level($user_login = 'vidal') ){

   header('Location:http://www.getouttahere.com);

   exit();
}

?>

This one came in handy, since I needed to temporarily redirect people to another site and keep on working quickly to fix the site ASAP.


So, there you have it. This is a very simple way to keep scripts safely confined (even if they fail while you are testing them). I hope you find it useful!


Categories
Uncategorized

Lesson learned: You can’t access DOM elements within an external iFrame

While working with Google Custom Search Engine (CSE), I needed to access elements within the <iframe> containing the search results it generated. Using jQuery, I tried to select the iframe first and its content:

$('#cse-search-results iframe').contents();

But as soon as I tried to do something with it, I’d get a “Error: Permission denied to access property ‘nodeType’” message.

Turns out, <iframes> follow the same origin policy, which prevents you from accessing them directly if they weren’t generated from your own domain. Of course, you can create a proxy file with PHP to retrieve the data first and then add the resulting HTML to your script to get around this problem.

I know, I know… it makes sense now. But I just didn’t know, so, lesson learned!

Categories
Uncategorized

How to use CSS sprites to create custom bullets in HTML

When creating unordered lists (i.e. the ones with bullets and not numbers or letters) in HTML, you can use the list-image CSS property to use an image to replace the default bullets HTML supports.

That’s cool. But, if you are mindful of front-end optimization and decide to use CSS sprites throughout your site to reduce HTTP requests,  the list-image CSS property falls short, because it is intended to use only one perfect, well-tailored bullet image for each bullet style you define. So, if you have ten different types of lists with different image bullets, you will need as many or more separate images to customize your lists. And that is NOT cool.

So, how do you use CSS sprites to create custom bullets?

Example

First, here is the demo of the bulleted list with custom bullets made using CSS Sprites we’ll be developing in this example. A few things to notice:

  • The bullets are made of custom images contained in a CSS sprite.
  • The bullets change on hover from gray to red, just like each link does (something not accomplished by default when only using the a:hover CSS property).

Now, let’s get to it.

What you need:

The HTML

This is the basic HTML we’ll use for this example, which creates a list of links to awesome tropical flavors:

<ul id="my-list">
	<li><a href="#">Mango</a></li>
	<li><a href="#">Banana</a></li>
	<li><a href="#">Watermelon</a></li>
</ul>

The CSS

This is the initial CSS we’ll use in this example. We’ll develop it more as we go along:

#my-list{
	width: 120px;
	padding: 16px;
	border: 1px dotted #CCC;
}

#my-list a{
	display:block;
	padding: 4px 0;
	color:#333;
	text-decoration:none;
}

#my-list a:hover{
	color:#900;
}

#my-list li{
	margin: 0 0 0 12px;
}

The HTML and CSS above generate a list that looks like this:
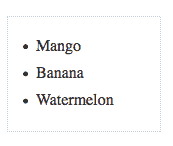
The custom-bullets sprite image

Ok so, what’s are CSS sprites, again?

In a few words, CSS sprites are basically images that contain a grid of images, like this one from Google. The idea is that instead of loading each image separately, you can load a master image that contains them all, and then use that master image as a background in all HTML elements that need it. This helps reduce the amount of HTTP requests your page makes on load, which then helps reduce loading times. A List Apart has a seminal article on CSS Sprites that, despite being old, will still blow your mind. Also, Christ Coyier from CSS-tricks.com has a cool article with more info on how to use sprites with an example from his own website. Read it.

Here’s the image very simple image sprite we’ll use for this example:

Getting it done:

Let’s further expand the CSS above to make this thing work:

  1. Remove the “bullets” from each li element
#my-list li{
	margin: 0 0 0 12px;
	list-style:none;
}
  1. Remove the left margin and  some the same amount in padding. This helps both make up for the space lost when the bullets were removed and open some space between the border of the li element and the anchor element contained in it
#my-list li{
	list-style:none;
	padding: 0 0 0 12px;
}

At this point, the list should look like this:
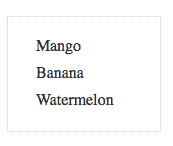
  1. Set the sprite as the background for the li element
#my-list li{
	list-style:none;
	padding: 0 0 0 12px;
	background: url(images/sprite.png) -8px 0px;
}
  1. Set the background for the :hover of the li element
#my-list li:hover{

background: url(images/sprite.png) -8px 24px
}

Notice that the list element is now using the sprite image as its background, but it repeats all over the place:
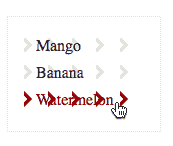
There are two ways to solve this, depending on how your sprite is set up:

  1. a) If your sprite is setup vertically (i.e. if all the images in the sprite are stacked in one column), you can do with just setting the background-repeat to repeat-y at it will do the trick:
#my-list li{
	list-style:none;
	padding: 0 0 0 12px;
	background: url(images/sprite.png) -8px 0px repeat-y;
}

#my-list li:hover{

	background: url(images/sprite.png) -8px 24px repeat-y
}
  1. b) If your sprite is setup horizontally (i.e. if all images in the sprite are distributed across the grid, next to each other, like the one in the Googlee example shown above), you may be better off by setting up background color for the most immediate element contained in the li element (in our case, the <a> element):
#my-list a{
	display:block;
	padding: 4px 0;
	color:#333;
	text-decoration:none;
	background-color:#FFF;
}

Whichever the case, your list should now look like this:
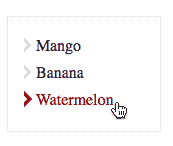
And that’s it! Click here to see the live example »

See you next time!

Categories
Uncategorized

PHP – Safely serialize and unserialze arrays

Serializing arrays in PHP is a great way to format their content before storing it in a database. However, if the serialized content has certain characters (such as “;” or “:”)  the resulting string won’t be read correctly by the unserialize() function,  which is a huge bummer. So, here’s a workaround.

http://davidwalsh.name/php-serialize-unserialize-issues

Categories
Uncategorized

My response to Stackoverflow’s ““invalid label” Firebug error with jQuery getJSON” question

“Invalid label” Firebug error with jQuery getJSON

Categories
Uncategorized

Smashing Magazine – jQuery Plugin Checklist: Should You Use That jQuery Plug-In?

jQuery Plugin Checklist: Should You Use That jQuery Plug-In?

Categories
Uncategorized

WordPress: How to display all posts in one page

Although displaying all your latest posts in WordPress may seem like a no-brainer (after all, the default home page already displays your  “Latest Posts”), doing so is kind of tricky if you are trying to do it in on a custom page.

Here’s a little code that can help you accomplish that. Basically, you need to override the $wp_query object with a new query:

<?php 
$wp_query = new WP_Query(array('post_type'=>'post', 'post_status'=>'publish',
'posts_per_page'=>10, 'paged'=>get_query_var('paged')));
?>

Put this code at the beginning of your default  page.php template (or your custom page template) right before the Loop, and you are done!

Categories
Uncategorized

Sample content for WordPress theme development

A big part of the WordPress theme development process is to asses what each possible HTML element will look like (images, tables, lists, paragraphs, etc). The guys at WPCandy.com have put together a set of posts with all the sample content you may need, so you can be thorough in you CSS formatting:

http://wpcandy.com/made/the-sample-post-collection

Categories
Uncategorized

Detect IE6 with PHP

Let’s say you want to server-side detect whether a user’s browser is the dreaded IE6 using PHP (instead of on the client side, which is usually done the conditional comments <!–[if IE 6] –>).

PHP’s function get_browser() is a way to get there, as this function gives you an array or object with info on the user’s browser’s capabilitties. But if you just want a quick and dirty way to find if it’s IE 6 they are using, you can just access the global variable $_SERVER[‘HTTP_USER_AGENT’] to get it done:


<?php 
$using_ie6 = (strpos($_SERVER['HTTP_USER_AGENT'], 'MSIE 6.') !== FALSE);
?>


The strpos() function helps you find the position of the string “MSIE 6.” within the string returned by $_SERVER[‘HTTP_USER_AGENT’]. Done.

Credit where credit’s due: http://stackoverflow.com/questions/671890/can-i-detect-ie6-with-php

Categories
Uncategorized

How to automatically add tags to WordPress posts

This one drove me crazy, but I finally figured it out.

In WordPress, if you need to automatically add tags to a post via a PHP script, the best way to do it is via the wp_set_object_terms() function. There is no handy “wp_insert_tag()” function, or something like that, so look no further.

wp_set_object_terms()

wp_set_object_terms() is a powerful function that not only helps you assign tags to posts (or pages), but also categories and other terms. For this example, here’s the PHP code needed to assign tags to a post.

<?php
   $tags = array('html', 'css', 'javascript');
   wp_set_object_terms( $post_id, $tags, 'post_tag', true );
?>

The code above will create the new tags (or terms) if they don’t exist and link them to the post specified by $post_id.

For more info on this function and its parameter, check out the codex page at http://codex.wordpress.org/Function_Reference/wp_set_object_terms/

Categories
Uncategorized

How to automatically login a user into WordPress

When developing for WordPress, sometimes you may need to create a PHP script that will automatically login a user so you can enable user functions. I needed to do something like that when creating a public form to submit posts from the front end using Ajax. The WorpPress function wp_singon() was the perfect solution.

wp_signon()

The wp_signon() function takes the user account’s username and password as parameters, and will allow you to set up a secure cookie for the new session. For more info, check out the function’s codex page: http://codex.wordpress.org/Function_Reference/wp_signon

Another way to auto-login:

Cleverwp.com has an interesting post on how to Autologin a WordPress user in your PHP script which only requires the user’s login name. It’s pretty straight forward, though not as secure.

Categories
Uncategorized

How to get the ID of the last insert post in WordPress

When programming for WordPress, sometimes you may need to get the ID of the last post that was inserted to the database (à la MySQL’s ‘LAST_INSERT_ID’).  Here’s the thing: the wp_insert_post() function returns the newly inserted post’s ID, so you can use it to perform more stuff on the post right away, without having to mess around with any SQL commands to retrieve it. Clever, huh?

wp_insert_post()

The function wp_insert_post() does that, it inserts posts into the WP database. You only need to create a required object (or array) containing  a few  properties of the new post (such as post_title, post_content, post_status, etc) to get it rolling, and it will fill in any blanks you might’ve missed.

But the main point here is that the wp_insert_post() function returns the newly inserted post’s ID.

Here’s an example:

<?php

//insert new post
 // Create post object
 $my_post = array();
 $my_post['post_title'] = 'Hello world';
 $my_post['post_content'] = 'This is a sample post';
 $my_post['post_status'] = 'published';
 $my_post['post_author'] = 7; //the id of the author
 $my_post['post_category'] = array(10,12); //the id's of the categories

 // Insert the post into the database
 $post_id = wp_insert_post( $my_post ); //store new post id into $post_id

?>

Now the $post_id variable contains the id of the last inserted post, and you can use it in the rest of your script.  For example, we could use it now to assign tags to the recently added post:

<?php

//now add tags to new post using the last inserted post id in the $post_id var
 $tags = array('html', 'css', 'javascript');
 wp_set_object_terms( $post_id, $tags, 'post_tag', true );    

?>

Cool, huh?

For more info on the wp_insert_post() function visit check the codex page at: http://codex.wordpress.org/Function_Reference/wp_insert_post

Getting last insert id from the $wpdb object:

The $wpdb object stores the last insert post id as a property. I tried using it and it didn’t work for me, but you can still try to use it. Here’s the codex page:

http://codex.wordpress.org/Function_Reference/wpdb_Class#Class_Variables

Categories
Uncategorized

How to center divs within a page with CSS

Sometimes you may want to center a div element within a page, whether vertically, horizontally, or both (dead center). Here’s how  you can accomplish all of that using CSS.

What you need:

The HTML

For this example, we’ll use the following HTML code:

<div id="container">
<p>Some content goes here.</p>
</div>

The CSS

The basic formatting for the #container element will be:

#container {
border: 1px solid #000;
background-color: #69C;
padding: 8px;}

Getting it done:

How to center a div element horizontally

To center a div element horizontally you need to:

  1. Set its left and right margins to auto,  which will automatically set the margin space on both sides of the div element, centering it within the page.
  2. Declare the div element’s width to override the default width: auto property, which makes div elements be as wide as their containers .
Here’s the CSS:
.center_horiz{
 width: 158px;
 margin: 0 auto;
}

See example here

How to center a div element vertically

To center a div element vertically vertically within a page, you need to:

  1. Set the position of the element to absolute, so it uses the height of the page as reference.
  2. Set the top property to 50%, so the div element moves down to the middle of the page
  3. Use the margin-top property to move the div element a little bit above the middle of the page (if you need to).
Here’s the CSS:
.center_vert{
 position: absolute;
 top: 50%;
 margin-top: -35px;
}

See example here

How to center a div element both vertically and horizontally (dead center)

To place a div element dead center within a page, you can use the same technique as when centering it vertically and apply it to center the div element horizontally as well. To accomplish this, you need to:

  1. Set the position of the div element to absolute, so it uses the height and width of the page as reference.
  2. Set the top and left properties to 50%, so the div element moves down and to the center of the page.
  3. Use the margin-top and margin-left properties to move the div element a little bit above and left of the middle of the page (if you need to).
Here’s the CSS:
.dead_center{
 position: absolute;
 top: 50%;
 left: 50%;
 margin-top: -35px;
 margin-left: -85px;
}

See example here

And that should be it. See you next time.

Categories
Uncategorized

How to load CSS stylesheets dynamically with jQuery

Sometimes you may want to load a CSS stylesheet dynamically after your HTML page has loaded and certain conditions are met (for example, if an element with a specific class exists in the DOM). jQuery can help you accomplish that with only a few lines of code.

How to get there:

The HTML:

For this example, let’s say we need to load a stylesheet to format a div tag in the following HTML code:

<html>
<head>
<title>jQuery - Load CSS</title>
</head>
<body>
<div id="container" class="class">
<p>This is a div tag that was formatted using <a href="http://www.jquery.com" alt="Link to jQuery.com">jQuery</a>
</p></div>
</body>
</html>

The CSS:

This will be the CSS code in our sample stylesheet, “style.css”:

#container{
   border: 1px solid #000;
   background-color:#EEE;
   padding:8px;
   margin:8px;
   width: 200px;
}

The jQuery:

These are the jQuery functions we’ll use to get this done:

  • $() wrapper: as the main and most powerful jQuery function, we’ll use it to:
    • Execute code once the document has been loaded
    • Determine whether the #container div element exists in the DOM and, if true,
    • Create new HTML to link the style.css stylesheet to our page
  • append(): this jQuery function allows you to append new HTML code to any element in the DOM. For this example, we’ll attach a new <link> element to the <head> element of our document.

Bringing it all together:

With our HTML and CSS files in place, let’s get this done:

Load jQuery

  • Add the following code between the </body> and </html> tags in your HTML document (Note: your actual path might be different than the one on this example, depending on where your jquery.js file has been stored)
<script type="text/javascript" src="../jquery-1.4.2.min.js"></script>

Add the jQuery code

  • Right under the last line, add the following code:
<script type="text/javascript">

$(document).ready(function(){ //Once the document is ready, run the following code

   if($("#container").size()>0){ //Check if at least one element with the id "#container" exists within the DOM

      $("head").append($("<link rel='stylesheet' href='style.css' type='text/css' media='screen' />")); //if true, append the new <link> element to the <head> element in oor HTML page    }
});

</script>


* * * UPDATE * * *

Domenico Testa pointed out that the approach above doesn’t work correctly in IE. IE needs the  document.createStyleSheet() function to attach new stylesheet after loading the page:

document.createStyleSheet('style.css');


So, the final code should be:

<script type="text/javascript">
	$(document).ready(function(){

	if($("#container").size()>0){
			if (document.createStyleSheet){
				document.createStyleSheet('style.css');
			}
			else {
				$("head").append($("<link rel='stylesheet' href='style.css' type='text/css' media='screen' />"));
			}
		}
	});
</script>

View example here »


And that should be it. This technique is useful if your page has loaded and you want to load extra CSS files when certain elements exist in the DOM. This can help you save some bandwidth and make your page load faster.